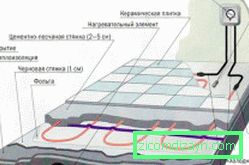
Features of installation of a warm floor under a tile
The heating system "warm floor" is becoming more popular among owners of apartments and private houses. Especially often the installation of a warm floor under the tile is used in bathrooms, bathrooms, baths, saunas. This design provides additional heating of tiles and a comfortable temperature in the room.

The warm floor will allow walking barefoot, and also helps to warm the entire room.
Installation of a warm floor
Installation of a design of a warm floor under a tile - an optimum variant if the premise below is already provided with thermal insulation. With it, you do not have to put an additional layer of insulation and do the screed, because the tiles and glue act as materials that insulate the heating element.
It is important to remember that underfloor heating can not be installed.
Before you begin the installation, you need to check the availability of all materials and tools:
- The design of the warm floor, which includes the heating element;
- fasteners and wires for connection;
- the regulator;
- copper cable providing grounding;
- RCD protection system;
- wire, connecting installation, controller and counter;
- thermal sensor

Elements of a warm floor.
To calculate the amount of the desired material was correct, the instructions of the manufacturer of the warm floor should be used. Also, the calculation of the heat loss of the room is used, the pitch of the wire is determined, the length required for the entire room is set.
It is necessary to check what load the general input of electricity can withstand. In case of insufficient level, it must be replaced with a suitable one.
Surface distribution
After all the materials and necessary tools are acquired, and the calculations are completed, you need to create an accurate installation plan, setting it on paper. This scheme (figure 1) should take into account the areas on which large pieces of furniture or household appliances will be installed, as well as places where heat sources, for example, heating pipes, are located. On such surfaces, do not place heating cables.
The installation diagram will look like an irregularly shaped figure inscribed in the room space. Installation of the floor under the tile is carried out inside this circuit.

Kinds of a warm floor.
If you plan to install floors in several rooms, it will be right to provide a separate supply of electricity for each of them, even in the case of a symbolic division of rooms into plots or areas.
The plan drawn up in accordance with the scale is transferred to the surface of the sexes. At a suitable point on the wall, the position of the regulator is fixed, an opening is made for the future installation box, and the rod is lowered to the floor level.

Picture 1. Scheme of installation of a warm floor under a tile.
Before starting the installation, carefully prepare and clean the surface. If necessary, the old screed is removed.
The layer of the waterproofing material is laid taking into account the stock of 10 cm, which goes to the wall. A damper tape is attached around the perimeter, which will help to compensate for the expansion of the floor surface during heating. Surplus stocks are cut off after work is completed.
Additional thermal insulation of the base of the floor will save heat in the room and will not let it go idle down. The choice of type of insulation for the installation of a warm floor may depend on the location and purpose of the rooms. Tiles are used in rooms with high humidity. If the insulated room is located on the lower level, it is better to use extruded polystyrene foam. In unheated rooms it is better to apply a layer of mineral wool about 10 cm thick.
On the layer of thermal insulation for the warm floor under the tile is recommended to lay reinforced mesh. It is required when installing such a floor in a bathroom or a bath to provide grounding.
Step-by-Step Installation
Installation work should start with checking the resistance of the wire, checking the readings with the instruction. The maximum run-up of actual and declared data should not be more than 10%. After grounding the valve and bringing it to the regulator, you can begin the installation.
If the wire is located at the places of separation of the slabs, it must be hidden in the corrugated pipe. This will eliminate the cable rupture during the expansion of the plates from the thermal impact.
Preliminary on the plan, you need to identify the connection points. This is useful if you need to repair or dismantle the warm floor in the future.
When all elements of the structure of the floor are located in the established places, another check of the resistance of the wire is carried out. If the resistance level corresponds to the declared or insignificant difference, the power can be switched on.
From the regulator to the stem is a corrugated tube, in which there is a thermal sensor that regulates the work and warming of the warm floor under the tile. The other end is output exactly between the closest sections of the cable.
For a temperature sensor, it is sometimes advised to use a tube larger than the one supplied. The sensor is placed inside the tube before starting the filling, and the cable does not overheat, as heat is distributed over the screed.
After the installation is completed, the system is disconnected from the power supply, and the regulator is removed. Forming screed, put tiles, finishing work. After that, you can start operating the underfloor heating.