How to make a screed in the bathroom
Screed is the most important stage in the device floor. Especially it concerns the bathroom, where the presence of the screed determines the correct loads on the floor, and protection against all kinds of leaks and high humidity levels. But it is also necessary to know the basic principles by which it is necessary to make a screed.

Scheme of floor screed device.
Base and insulation
Self-leveling floor screed is done in several basic stages, the order of which is extremely important. How to make a floor screed in the bathroom correctly? For this, it is necessary to take into account all the subtleties of the work, otherwise the result will not be of sufficient quality. Tools and materials:

Technical characteristics of leveling mixtures for floors.
- brushes;
- primer;
- sand, cement and water for mortar;
- solution tank;
- rule;
- level;
- bituminous mastic;
- waterproofing rubberized roofing material or other similar material;
- Styrofoam;
- construction knife;
- guide metal strips.
So, the first and important stage is considered to be the preparation of the foundation.
If your bathroom is new, and the floors in it have not been previously used, it will be enough to clean the surface of debris and dust and make insulation. In the case of the old room, you must first remove the old screed, no matter how tightly it is held on the floor.
It is very important to make the surface as clean as possible. Therefore, the use of a washing vacuum cleaner will be quite justified here. It is especially good to clean an uneven surface, since a lot of dust can get into the recesses.

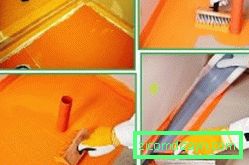
Liquid waterproofing of the floor in the bathroom.
After this, it is necessary to allow the surfaces to dry out, and then proceed to moisture insulation. Do not use film for this, as this will be unprofitable. You will spend a lot of money, but after 1.5-2 years the film will deteriorate under the influence of cement and cease to perform its basic functions.
The optimal option is a bitumen based mastic and any roll material, for example, roofing material. So, at first the surface of the floor is carefully ground. It is better to cover the floor with a primer 2 times so that the mastic then seizes well. Then coat the floors once with bitumen.
The next step is the flooring of the insulation material. It must be heated to a plastic state, so that it adheres well to the smeared surface. Note that you need to cover them not only the floor, but all the walls at a height of about 20 cm, paying attention to the corners, where you can make additional fixation with bitumen. The same goes for engineering communications, the lower part of which must be protected. Now let everything freeze and grasp.
Warming of the floor
The next stage is warming. You have two ways of warming the floor: a normal one, characterized by the use of inexpensive materials, and modern, using an electric or water-heated floor system. The first option is economical, reliable, but it will not make the surface noticeably warm. The second option is capable of heating the floor to the required temperature.

Scheme of installation of an electric warm floor in the bathroom.
So, for warmth, we first cover the floor with sheets of foam plastic, the thickness of which is about 3.5-4 cm. A so-called screen is placed over the foam plastic, it will reflect heat. As such a screen, a soft special foil is used.
Further, the reinforcing mesh should be laid evenly over the entire surface, since in the future it is also planned to fill the floor. The listed steps for floor insulation are the same for both options. Next, fill is done if you are going to do the usual floor. In the case of a water or electric floor, pipes or special thermocouples from wires should be laid directly on the mesh.
Filling process
The third stage - pouring self-leveling. First make beacons to make the surface smooth. To do this you will need a tape measure, level, guiding profiles for drywall and mortar. Every 50 cm, parallel to each other, lay the guides along the level, attaching them to the floor with small slides of the solution. The mortar can also be fixed every 50 cm.
It is very important not to forget that the height of the screed should not be less than 5 cm. Therefore, when fixing the beacons on the mortar, immediately take this into account. Better to let the screed thick than thin. The lack of a solution in the future will cause cracks, which can greatly damage the decorative floor covering.

Scheme of the screed filling process.
Next, you need to properly prepare the solution. It should not be either too thick or too sparse. For any floor, a solution that contains about 3 parts of clean sand and one part of cement is suitable. Water should be added gradually, so that there is no excess.
The most difficult thing is to fill the screed correctly. Here you will need a rule. So, a sufficient amount of solution should be simply poured on the floor near the wall, starting with the corner. Then the rule is to distribute the solution on the floor so that its level does not fall below the level of the beacons. Since the beacons are installed parallel to each other and form a kind of track, then the fill should be done just along these tracks. It is necessary to try, that the poured solution was sufficient for the entire track.
So you need to work through the entire surface of the floor. After this, ensure that the surface is at rest for 3-5 days, until the pouring is seized. And after the time has elapsed, remove the guide profiles that served as beacons. Do it neatly, attaching it with a screwdriver or a thin chisel.
Of course, from the lighthouses on the coupler there will be small strips. This can not be left so. It should be carefully sealed with a small amount of dilute cement mortar. Now wait about 2 more days until the cracks are dry.
Now it remains only with the same rule to finally polish the surface of the floor, removing all the notches and sharp minor bumps. When this is done, leave the screed finally set, covering it with a large piece of polyethylene in order to prevent evaporation of moisture.
The floor tie in the bathroom with your hands you did. After solidification, you can remove the film and boldly proceed to the decorative finish - tiles, paint or other desired material. Such a floor in the bathroom will serve you for many years without causing problems.