Technology of tiling with walls and floor tiles
The tile has excellent heat resistance, strength, is not afraid of moisture, has good sound insulation properties, is durable.

Scheme of options for laying tiles.
And if we add to this the variety of color, structural and artistic solutions of the surface of modern tile materials, then we can be sure that the facing of the tiles as finishes of the most different rooms will not lose its relevance for a long time.

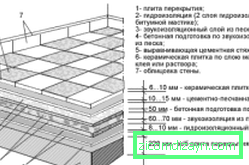
The scheme of construction of ceramic tiles.
The technology of tile stickers is quite simple:
- Preparing the surface of the wall or floor under the tile;
- the marking of the surface is made;
- superimposed and leveled the adhesive mass;
- The glue is applied to the glue and aligned to the markings;
- the distance between the tiles is "beaten off" by special marking crosses or other devices;
- Intertile stitches are erased.
In practice, there are many nuances. The walls and floors to be made can be uneven. Surfaces have different structures. Premises come in different sizes and configurations. All these nuances must be taken into account.
In any case, it is quite possible even for a beginner to understand all the basic details of finishing with a tile of a particular surface.
Materials and Tools

Tools for tiling.
For the gluing of tiles (without taking into account surface preparation) materials are purchased:
- actually tile;
- adhesive mass;
- mixture for grouting joints;
- marking crosses.
In the process of the label, the use of such tools as:
- level of construction for marking the surface and control of laid tiles;
- rope plummet;
- chalk and pencil for marking the surface and the tile itself;
- ambulance and roulette;
- brush or platen for priming;
- spatula with a tooth side to distribute the adhesive mass over the surface to be bonded;
- a spatula made of rubber for rubbing joints;
- rubber or wooden hammer;
- tile cutting machine;
- conventional glass cutter;
- Pliers, nippers or pliers for breaking off pieces of tile;
- wooden slats or timber;
- grindstone, emery, file for processing the trimmed tile edge;
- hacksaw or jigsaw for cutting ceramics;
- Capacity of 5 liters to prepare the adhesive mass;
- latex gloves;
- sponge and rags;
- thread or string.
Tile Selection

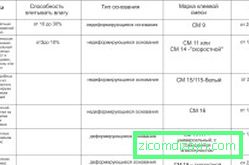
Table of characteristics of tile species.
With all the variety of sizes, shapes, colors and configurations of modern tiles, the main criterion for selection should be the parameters of the room to be lined and its purpose.
When choosing a tile, it is useful to know that the glossy surface and light colors of the colors visually increase the space of small rooms, for example bathrooms and toilets.
Strengthen this effect and help shape the tiles. Rectangular, laid horizontally, it visually expands and lowers the room, thereby improving its proportionality. On the contrary, a square tile or rectangular, but located vertically, zauzit internal dimensions of the room and visually "lift" the ceiling.
In spacious premises it is more expedient to use a large-size tile, and it fits more quickly.
Choosing the texture of the tiled surface, you also need to remember that glossy increases the space, and matte, on the contrary, narrows.
When choosing a floor tile, the "slipperiness" of its surface plays an important role.
By strength, the tile material is divided into four categories. The most sturdy tile is category IV and is used for finishing exterior entrance areas, hallways and halls.
The 1st, the "lightest" category is tile, the purpose of which is wall lining in bathrooms and kitchens.

Marking tiles.
When choosing the color of tiles, it is also necessary to take into account the lighting in the room to be trimmed. Daylight sunlight "saturates" the colors, giving it a "juicy" look.
Artificial lighting in different ways "highlights" tiles.
Incandescent lamps give the tile warm shades. Halogen fluorescent lamps, on the contrary, "cool down" and impoverish the color of the material.
Thus, in order to achieve the effect of a bright and spacious room, it is better to use a medium-sized light tile without a pattern or with an unobtrusive neutral image.
To create coziness and an atmosphere of "chamberiness", you can choose darker color tile solutions.
The most practical and unpretentious in maintenance is a large-sized tile with a matte surface and a dark tone of grouting.
Surface preparation

The scheme for installing tiles on the wall.
Preliminary preparation for covering the walls with tiles can be reduced to two components: leveling the wall, which has deviations from the vertical plane, and increasing the adhesive properties of the surface.
The alignment of the wall should be carried out if the deviations from the vertical are from 2 cm and higher.
Small irregularities are eliminated by wet plasters, cement or gypsum plasters.
If the unevenness of the wall plane is large enough, but not more than 6 cm, then a metal plaster grid is used, with the cells from 1 to 3 cm. The grid is firmly fixed on the surface, forming an equalizing and supporting frame, and already applied to it is a plaster or cement plaster layer. The plaster is leveled and processed under the sticker of tile.
For critical deviations of the pasted surface from horizontal or vertical planes, from 5 cm or more, the wall is leveled using the "dry plaster" method. In other words, the surface is leveled with plasterboard sheets.

Tools for removing glue from tiles.
Drywall sheets are fixed on the surface of the wall, previously cleaned and primed, using a special gypsum adhesive installation. When combining sheets, cross-shaped joints must be avoided.
Plasterboard sheets laid on gypsum glue are leveled with a slight "tapping". A rubber or wooden hammer is used.
Align sheets of gypsum board is necessary quickly enough, as the gypsum-based mounting glue quickly hardens.
The plasterboard wall is primed with a special primer with a high degree of penetration to increase adhesion.
Only after all the facing of the walls with gypsum boards has been completed, the puttying of the seams with the finishing putty is made.

Scheme of types of wall tiles.
To increase the adhesive properties of the applied surface, special primers such as "Concrete contact" are used. The smooth walls of bricks or slag blocks are cleaned from large cement deposits and are subjected to an adhesive primer immediately before gluing, in order to bind dust particles that are necessarily present on any cleaned surface.
It is necessary to know that formwork for the formation of reinforced concrete structures is preliminarily treated with lubricants (engine oil). This is necessary so that it can be easily removed.
Part of the lubricant remains on the surface of the concrete and sharply impairs adhesion. As a result, the glue on such a surface "floats" and the tile exfoliates.
Therefore, the walls of reinforced concrete, obtained by the formwork method, should be preliminarily sewed with a plaster grid and already glued the tile on the grid.
If you need to glue the tile on a painted wall, the color should be completely removed. If the paint is kept very firmly, the wall is flat and the layer of adhesive is meant thin, then the colored layer may not be removed. But at the same time on the wall surface it is necessary to put notches for better adhesion of the glue.
Selection of glue
There is a huge number of options for adhesives for tiles.

Consumption of glue for tiles.
The tile is glued to cement mortar with the addition of PVA, to a mixture of bitumen with diesel oil, to "liquid nails", oil paint with cement or silicone. All this is acceptable, if the surface is flat and no leveling of the tile is required with the adhesive mass.
If tiles have to be glued on chipboard, chipboard, MDF or plywood, then it's best to use special synthetic adhesive and sealing compounds. In this situation, a normal silicone "works" well, but it requires thorough preparation of the surface.
For walls with traditional cement, plastered and puttyed coating, it is best to use special synthetic adhesive compounds that can be used with any type of tile.
There are a lot of such compositions, all of them are developed using the most modern materials. With their help you can not only qualitatively glue the tile, but even out small irregularities, remove blemishes.
Layout of walls

Layout of the wall for tiling.
High-quality facing of walls requires marking. The marking of the surface for finishing the tile begins with a "chisel" of the lower row.
If the flooring has already been laid and the tile will be glued straight from it, no markup is required.
If the floor will be laid after the pasting of the walls, the beginning of the wall facing becomes the second lower row. Tiles of the first row will be pasted and trimmed later, on the finished floor.
A mark is made on the wall. Distance from the mark to the floor - one tile. Using a level, this line marks a strictly horizontal line along the entire length of the walls to be glued.
The distance is measured from the floor to the line drawn. The smallest value is detected and noted. It is this lower mark that will be the starting point. From the bottom mark, another line is drawn along the entire length of the walls, strictly horizontal. This is the beginning of the cladding - the bottom line of the second row of tiles.
If the line from the first mark was at the same distance from the entire surface of the floor, it means that the floor is perfectly even and there is no need to trim the tiles in the first row.
With a large area of the room using the usual spirit level for carrying out a horizontal line is difficult. In this case it is better to use a hydro level. Put a few labels on the wall being marked. All tags are connected, and the necessary line is obtained.
On the lower border is stuffed a bar or a beam, serving as a support for tile.
Technology cladding

The scheme of laying tiles on gypsum board.
The wall is prepared, marking is made, the glueing mass is diluted - the tile is directly labeled.
- The beginning of the wall covering is priming. The glued plane is covered with a deeply penetrating primer 10-30 minutes before the beginning of the pasting. This will connect the dust particles.
- Apply a layer of glue. The glue is applied to a small area of the wall surface and is "diluted" with the help of the toothed side of the spatula. You can apply glue directly to the surface of the tile. This is advisable when using cement mortar as an adhesive mass. The tile is pre-soaked for 10-15 minutes.
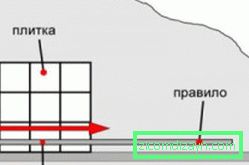
- The tile is put on the adhesive mass and pressed down, moving slightly to the sides to give it the correct position. It is very important to properly "postpone" the first tile. On it, in the future, the others will be leveled. To do this, just above the first row, the thread is stretched. It should lag behind the future tile surface by 2-4 mm. This thread will become a control level for the exact placement of tiles in the desired position. Most often, facing the walls starts from a distant, "visible" angle. First, the bottom row is glued, with the support of the tile on the fixed "punching" bar or bar.
- The rest of the tiles are pasted. The width of the horizontal and vertical joints is regulated by means of special inserts - marking crosses of different thicknesses. You can use matches, wedges and other, convenient in the particular case of the device. Correct alignment of the tile horizontally and vertically should be monitored as often as possible. Extruded adhesive from the joints must be periodically cleaned, not allowing it to dry out.
- The bottom row of tiles is pasted. It is cut if necessary. This is done after laying the finish of the floor or determining its height. For this, the "padded" bar is removed. Already installed tiles should, at the same time, firmly hold on the wall.
- After the final drying of the adhesive mass, the joints are mashed.
Wiping of seams
Interlacing stitches are carefully cleaned from glue and dust.
Matched by color, the trowelling mixture is diluted according to the instructions and clogged into the suture space. A rubber spatula is used.
Excess trowel mixes are removed with a wet sponge.
The joints must finally dry, after which they are polished with a hard sponge and wiped with a rag.
Gender skirt

The scheme of facing the floor with tiles.
The base of the floor is cleaned, if necessary - leveled.
Facing the tile floor is the same as the wall lining. On the base or on the tile is applied glue, the tiles are laid, pressed and positioned. The level is regulated by the horizontal plane.
Typically, the laying is done from the threshold to the far wall, but there may be different options. If the rectangle of the floor is uneven and involves cutting the tiles, then you can start the lining from the center, so that the cut pieces are hidden under the baseboard.
Wall cladding should be combined with the floor surface. The angle between them should be straight, joints - tight.
Ways of trimming
Trimming tiles can be made with a conventional glass cutter. In this case, the tile needs to be soaked. A glass cutter cuts the line along the markings on the front side. The tile is pressed against the table. The incision should be 2-4 mm from the edge. The protruding edge is pressed with a sharp hand. The piece breaks off.
In cases with a large number of cut material or thick tiles, it is better to use a special tile cutter. The narrow strips are cut with a hacksaw or jig saw with a special cloth. They can also do figured cutouts.
If the cut turned out to be uneven, excess parts of the tile are removed with the help of pliers, nippers or tie pliers.
The trimmed edges are ground with an emery, a file or a sharpener.
If you show patience and accuracy, then high-quality lining of walls and floors with tiles is available even for beginners.