How to sharpen a kitchen knife - 7 steps for beginners
To describe all the nuances of how to properly sharpen knives, within the framework of one article is simply impossible, but this is not always necessary. Especially, if in sharpening requires an ordinary kitchen knife or you are just a beginner who needs to start somewhere.
- In fact, at home, sharpen the kitchen knife to sharpness can easily and quickly. But the difficulty is that you need to do this so that the sharpness of the blade is preserved for a long time, and at the same time, too much steel has not been removed from the blade.
In this material, we will try simply and clearly to tell you how to properly sharpen a knife with a bar. After all, this method is not only basic and accessible to everyone, but also the most effective one. In addition to step-by-step instructions for sharpening and debugging, here you will find a selection of training videos and an overview of alternative methods - from grinding systems to the bottom of a ceramic plate.
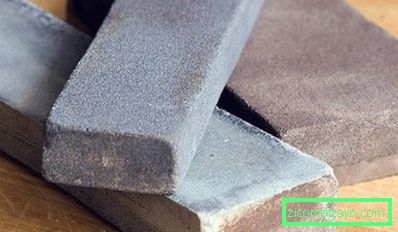
A bit about the choice of stones
Grinding bars are of the following types:
- Ceramic;
- Diamond;
- Natural;
- Japanese water stones.
If desired, as soon as you gain experience, you can buy a few solid and expensive diamond stones or Japanese water. However, it is better to start with ordinary ceramic bars (such as "Boats"), which are sold in every store of household goods. They are wear-resistant, durable and affordable. Of the shortcomings can only be called their uneven abrasion.
Here are tips to help you find the right assistant:
- What size should be a bar? Ideally - longer than 1,5-2 times or at least not shorter than the blade of the knife. The width and shape of the bar is not important.
- When buying a bar, make sure that it is flat and does not have chips.
- To begin with, you can buy one universal grindstone of medium hardness. But if there is a desire, buy one bar with two sides of different granularity or two stones with a large and smaller two times the grain size. In the future, your collection can be replenished with a couple more stones.
- It is best to try to get a pair of Soviet-made donkeys, say, at flea markets or at grandfather's. The bars marked "Made in the USSR" have one-dimensional grains and high-quality binding material.
To bring the knife to shaving sharpness, in addition to grinding stones, you can buy and GOI abrasive paste, about which we will also talk.
7-step instructions for sharpening and finishing the kitchen knife
So, in sharpening the knife one goal is to grind so much metal from the blade that the cutting edge becomes sharp again. Start work with a coarse-grained abrasive and finish with fine-grained.
It is important to remember the following principles of knife sharpening:
- The most important thing is to choose the optimal angle of sharpening and keep it on the entire cutting edge while sliding on the bar.
- Movements should be smooth, without pressure.
- All the bars should be moistened with water, preferably with a soapy solution: before sharpening (so that the blade slides better and metal dust does not clog the pores), in the process (to remove the emerging suspension) and at the end to clean the bar.
And one more important advice - the first time is better to practice on a knife, which is not a pity to spoil. Especially if your main knife is too good and expensive. Well, let's get down to practice.
Step 1. Rinse the stone with water, and then we spend on it, say, a sponge with a drop of liquid for washing dishes.

Step 2. Next, we sit down at the table and set the stone on a wooden board, for example, a cutting board. You can put it under a stone and a towel. Someone is more convenient to put the bar perpendicular to himself, and someone at an angle of about 45 degrees. In time, you will understand how it is more convenient for you to work.
Step 3. Now you need to determine the angle of sharpening and fix the position of the knife. What should be the angle? The general principle - the smaller it is, the sharper the blade becomes, and the more it is - the longer the blade keeps sharpness.
- Conventional kitchen knives sharpen at an angle of 40-45 degrees. If you sharpen a loin knife (intended for cutting thin pieces of fish, poultry and meat), then it should be sharpened sharply - at an angle of 30-40 degrees. The selected value should be divided by 2, and then we get the angle that should be between the blade and the surface of the bar. That is, to sharpen the blade at 45 degrees, each side should be sharpened at 22.5 degrees to the grind surface.
Lock the knife at an angle of 22.5 degrees will help you a simple reception, shown in the photo below.

- Remember, the chosen angle should be tried to stick during the whole work.
Step 4. We put the knife across the bar so that the upper edge of the handle is above the bottom edge of the stone. Holding one hand with a hilt and the other with a blade, we start sliding along the bar from ourselves along the path shown in the picture below.

Look at the short and visual video:
- The point is that the cutting edge, sliding over the stone, is always perpendicular to the direction of motion.
- On the bend of the blade, the handle of the knife needs to be lifted slightly to support the chosen angle.
- Remember also that you can not put pressure on the blade, but you should not give the slack.
Thus, it is necessary to hold the blade along the stone about 40-50 times, namely, before the occurrence of the "burr" (grate, micropyls) along the entire length of the RK (cutting edge). His appearance will tell you that the surplus metal is worn out and there is no further grinding. Then you need to turn the blade over and repeat the same steps. Visually on the video:
- Burr is a small roughness, which is difficult to discern, but you can grope, gently running your finger along the edge of the blade (but not along the edge, so as not to cut yourself).

A knife cut off the knife
During the work on the blade will appear a suspension - metal dust, which must be periodically washed off with water.
Step 5. So, the burrs have appeared, now we are starting to fine-tune. To do this, we repeat the same manipulations on a stone with half the grain size. An alternative method of fine-tuning is using musat.
- Musat is a steel rod of oval or circular cross-section with longitudinal notches. It is only suitable for straightening and maintaining sharpness, but not for sharpening a knife. Musatom is recommended to rule the knife every time before and after work.
How to rule the kitchen knife with moussat can be seen in the next video master-class from the respected knife-gardener Gennady Prokopenkov, who, by the way, specializes in making kitchen knives.
Step 6. If you want, you can bring your knife to a razor sharpness. To do this, take any leather or leather belt, treat it with GOI, Dialux or any other abrasive paste, and then do the same, but only in the direction from the cutting edge.
Step 7. Finally, we check the quality of the sharpening. This is done very simply. It is enough to cut a tomato or cut a piece of paper. If you wanted to achieve shaving, then you should try to shave the hair on your arm. The sharpest knives can even plan the hair, as shown in the photo below, but in the kitchen for the most ordinary knife such sharpness is not required.

Alternative methods of sharpening
If your kitchen knife - a simple and inexpensive "hard worker" and / or just to delve into the "knife culture" you do not want, then we recommend for sharpening at home use an electric sharpener, roller knife or sharpening system. What are their pros and cons?
- Electric power sharpen knives perfectly and quickly, but even the most high-quality models remove too much material from the blades, thereby shortening its service life. Another drawback of electrocution - a good device costs more than $ 200.
- Roller knife - an inexpensive and easy to use. With its help you can quickly sharpen the kitchen knife, but, unfortunately, the sharpness of the blade will persist for a while and the knife will eventually deteriorate. The greatest confidence among the roller knife uses a tool from Fiskaris (pictured). Do not confuse the roller knife with the V-shape. The latter is an option for the most unpractical.

- Sharpening systems are good in that they allow you to more precisely expose and maintain the angle. Such sharpeners are different - with the fixation of the blade (producers DMT and Lanski) and with the fixation of the stones themselves at a certain angle (Spyderco Triangle Sharpmaker). Separately, you can distinguish a sharpening system in which you can select the desired angle and control the position of the knife - this is the Edge Pro Apex Knife Sharpening System. Each system has its pros and cons. So, for example, it is inconvenient to sharpen wide knife-knives on sharpeners with fixation of a blade, and knives on the triangle from Spyderco are more likely to rule than are sharpened, and the angle can be chosen only 30 or 40 degrees. However, for kitchen knives just these corners are needed, and it is very easy to use triangles. A detailed overview and instruction manual of the sharpener from Spyderco can be seen in the following video.
What are the disadvantages of Apex Edge Pro? Perhaps, this is only a high price - $ 245. However, for sharpening kitchen knives you can buy a Chinese copy of this sharpener (eg, on Alyekspress).
There is another tricky way to sharpen a knife at home - with the help of rough risks on the bottom of a ceramic mug or plate. The principle of operation is the same - the preservation of the angle, smooth movements, the maintenance of the RC (cutting edge) perpendicular to the direction.